Hello everyday,
I made an instructional video on how to make fake wounds.
Let me take you through my process. The first thing I did was to get a stage wound makeup kit from amazon. This is the one I decided on after a lot of looking around. I also got this one because I wanted to learn how to make wounds with household supplies. To narrow it down to these two was a lot of work. There are a lot of stage makeup kits out there and they can get really expensive. Although I couldn’t find exactly what I wanted, the most trusted stage makeup brand is Ben Nye. From experience, and looking at the reviews on amazon, I knew I wanted a kit with modeling wax – a sticky gooey substance used to replicate skin, a full bruise wheel – a makeup wheel with all the colors needed (skin tone, red, blue, purpleish-black, green, and yellow), powder, and fake blood – some day I’ll learn to make my own. The Graftobian kit met all of theses criteria at the right price, so that’s the one I got.
After my kits arrived I read both instruction booklets and got a gist of what I need to do. I’m a strong believer of learning by doing. One can’t fully understand how to do something without doing it or experience it themselves. With that in mind I started to experimenting with the different supplies. Through a lot of trial and error. I mean a lot of trial and error. The first was Elmer’s glue, and I really failed that it didn’t get to a stage where I photographed the result
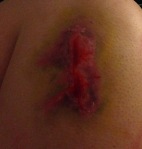
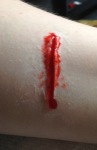
The next thing I tired was petroleum jelly. I was able to make it look somewhat realistic, but not really what we are looking for. It was too puss-y. It wasn’t the clean looking cut I was looking for. So, I tried to mix the glue and petroleum jelly.
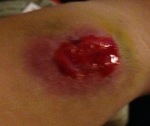
That really didn’t change the look. After that I decided to look at real cuts on the internet. I figured out that real cuts didn’t really have bruising around it. I finally gave up my attempt to use household supplies.
I switched to the modeling wax from the makeup kit. After doing that I was able to get the desired affect that I was looking for.
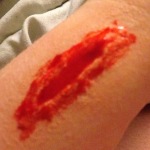
 With a couple more times with the modeling wax and now I felt comfortable with the technique.
The next step was to film myself making a wound. So, I called upon my friend Lee to help me. He filmed 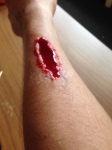 me as I made a wound. To thank him I made a cut on his arm for fun. The editing process was long and tedious. But, I learned a lot.
This whole project has been very educating. I really enjoyed learning how to do something I didn’t know before. I believe that, especially with a subject such as theatre, it is better to visualize the material. Just reading step by step how tos are sometimes hard to follow and unclear. But having action/pictures along with text.words can do wonders to help learn the material. I learned that it definitely makes the material more fun and easily accessiable to students. I hope that this would be a way to help me instruct students in the future, especially if one is absent and misses a class. I look forward to doing more like this in the future.
Until next time,
Theatrically Becca

Wow, I am very impressed with this video! Not only does the demonstration visualize the process and technique of this art but your voice over boils the process down into key steps. Very well done!!
LikeLike